-
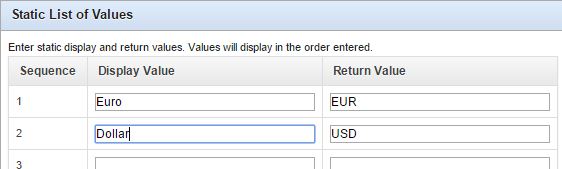
Pelvic inlet kadınlarda erkeklere göre daha geniş
-
Sciatic notch kadınlarda daha geniş
-
Subpubic açı kadınlarda geniş veya künt; erkeklerde dar veya keskin
-
Kalça kemiğinin genel gö…
Source: KALÇA KEMİĞİNDEN CİNSİYET AYRIMI
Pelvic inlet kadınlarda erkeklere göre daha geniş
Sciatic notch kadınlarda daha geniş
Subpubic açı kadınlarda geniş veya künt; erkeklerde dar veya keskin
Kalça kemiğinin genel gö…
Source: KALÇA KEMİĞİNDEN CİNSİYET AYRIMI
Bir sorgu hazirladiniz ve bu sorgudan donen sonucu periyodik olarak bir tabloya yazmak istiyorsunuz..
Ya da bu bir rapor ve bu rapora bakarak periyodik olarak bir kisi ya da ekibe mail gondermek istiyorsunuz..
APEX icinden nasil mail gonderilecegine dair kucuk bir ornegi su yazimda anlatmaya calismistim.
Simdi ise bunu “otomatik” hale getirmeyi deneyelim.
Farkli yontemler elbette var, ama ben -veri tabaninizin “eski” bir versiyonda olmadigini varsayarak- dogrudan dbms_scheduler uzerinden bir procedure ile ilerleyecegim.
i. Oncelikle sorgumuzu bir procedure haline getirerek objemizi olusturalim. Bunu APEX ‘in etkilesimli menulerine yaptirabilecegimiz gibi SQL konsolunda elle de yapabiliriz.
create or replace procedure “ORNEK_BASITMIS” is……
Sorgunun detaylari bu yazinin konusu degil. Fakat soz gelimi, belirli bir data setini dinamik olarak sececegimiz alicilara gondermek istiyorsak
Schedule etmeye karar verdiginiz islem sisteme periyodik olarak email gonderme isi vermekse ve ornek mail gonderme kismini burada isledigimiz gibi apex_mail.send uzerinden kotariyorsaniz, dikkat etmemiz gereken aslinda belki de tek onemli nokta su:
Hazirladiniz SP icinde BEGIN END arasinda APEX Workspace ID ‘nizi assign emelisiniz..
Aksi takdirde schedule ettiginiz Job ‘un calisma vakti geldiginde
ORA-20001: This procedure must be invoked from within an application session.
gibi bir hata ile karsilasirsiniz :)
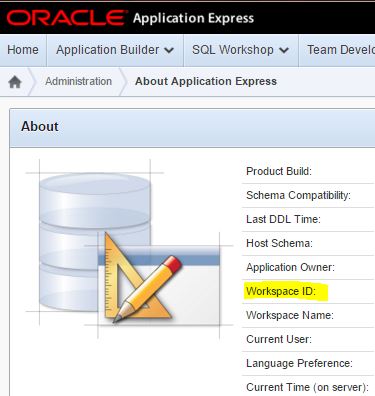
APEX Workspace ID
Bu ID bilgisine ustteki gibi erisebilirsiniz. Set etmek icin asagidaki gibi bir ifade kullaniyoruz:
wwv_flow_api.set_security_group_id();
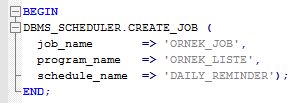
Stored Procedure ‘imizi hazirladik ve ORNEK_PROCEDURE ismi ile create ettik diyelim. Simdi sirasi ile DBMS_SCHEDULER ile once bir program create etmeliyiz:

Ardindan bir schedule create ediyoruz:

repeate_interval degiskenine dikkat edelim. Burada frekans, saat, dakika, saniye turunden bir cok deger verme sansimiz var..
Dolayisiyla, Ayin belirli bir gunu, Haftanin belirli gunleri, gunun belirli saatleri gibi spesifik periyod tanimlari yapabiliyoruz. Detayli bilgiye Oracle dokumanlarindan erisebilirsiniz.
Simdi de job create edelim:
Artik veri tabaninda bir SP ‘miz var ve bu SP ‘nin istedigimiz zaman araliklarinda otomatik calismasi icin bir Program tanimimiz, bir Schedule ‘imiz ve bir de Job ‘imiz var..
Simdi program ve job ‘imizi “acalim”.

Hazir.. Artik repeat_interval olarak verdigimiz vakit geldigi zaman job ‘in calismadigini kontrol edebiliriz.
Mesela az once enable ettigimiz Job ‘u suradan gorebiliriz:
select * from dba_scheduler_jobs;
Zamani geldiginde islemin calisip calismadigini ise su tablodan takip edebiliriz:
select * from user_scheduler_job_run_details;
Yaptiklarimizi drop etmek icinse yine DBMS_SCHEDULER icindeki
yapilarini kullanabiliriz. Fakat tahmin edebileceginiz gibi bunlari “sirali” yapmalisiniz, aksi takdirde sistem dependency nedeniyle kizacaktir :)

DROP etmek..
Gorusmek uzere!
Hi,
You published a useful interactive report for your users and now want to let them get that as email also through that page.
Here you can find a basic example..
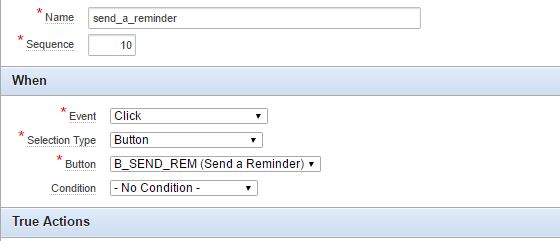
As you can see above, we have to create this action with some conditions. Such as:
Once we completed these steps, we can add a True action. You ‘ll see a button named Add True Action at your Dynamic Action Edit page. You can also create one by choosing from right click menu.
You may want to uncheck Fire On Page Load. Because.. Well we want to trigger it by clicking our button, manually :)
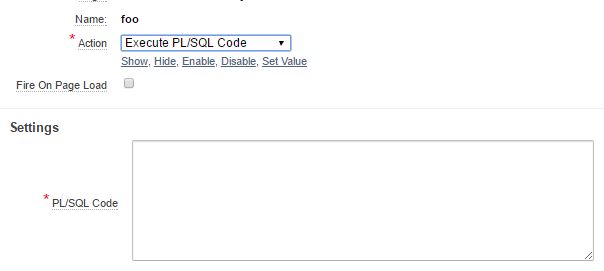
So.. Now we need this PL/SQL code which will take care of sending email via Oracle APEX.
I ‘ll share 2 basic examples with you. One for plain-text emails, one for HTML based ones.
I personally prefer to send mails in HTML format… But it ‘s up to you and depends on your needs..


It is pretty easy, right? Just give the right parameters and a simple sentence as email body. You can always use variables to collect these informations like i did..
If you want to go with HTML format, then you ‘ll need some extra time to create a good-looking and small-sized body. That ‘s all :)
Once you store these codes you ‘ve wrote and apply the changes onto your report page, you can start using your button. It should be sending emails to given address. Click on your button and wait couple of minutes to receive it.
I am not going to remind you not to copy everything from my sample snapshots. You do need to change email addresses etc. :)
Should you want to add some extra features on this dynamic action, you can add another True action(s) as well.
You may need to.. Otherwise someone would be able to click on that button more than necessary and we don ‘t want to spam people :)
Let ‘s add a Confirmation action..
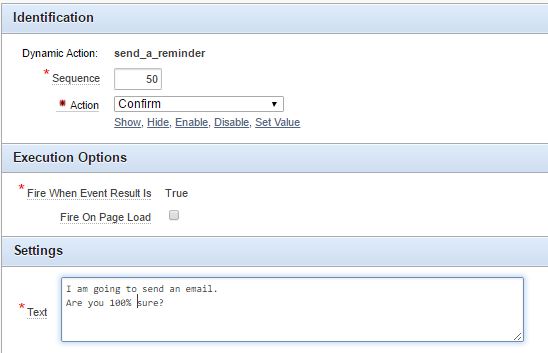
Now you ‘ll be prompted to click OK everytime you click on your email button..
O.K. but not enough? Well let ‘s hide the button after it ‘s got clicked.

Dag!
CV paylasmanin daha once bir kac “ilginc” yolunu gormustum.. Ama bu kadar orijinaline ilk kez rastliyorum :)

Dag!
It is not the best way to place an input field on your report interface if there are only a certain amount of possible input values. Right?
Let ‘s say we want our users to enter a Currency Code to return the Currency Rate of it..
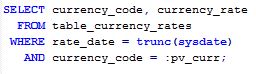
So you deployed that one to APEX as an interactive report..
Since we ‘ve a bind variable, there has to be page item on your report interface.. If you create your page item as TEXT field, it works just fine.
But the problem is, users can enter currency codes which are not exist :)
To avoid that, we can set the page item type as Pop-Up LoV.
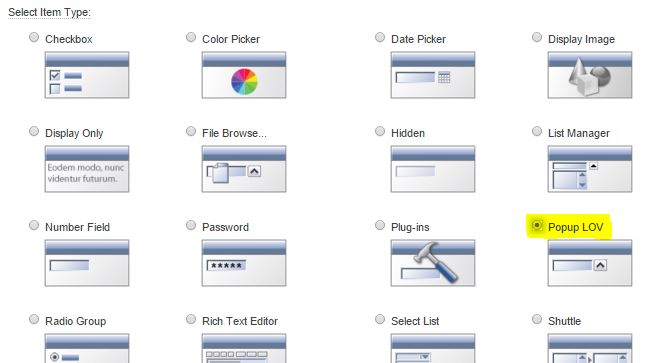
At some point, we will be prompted to define Values for our List.
Now we have 2 + 1 options:
Number one is quite easy.. Just type your values as it ‘s shown below, be careful with spelling.
Number two is a one time solution. Meaning, if you want to do same thing for another interactive report, you ‘ll have to do it again.
Say we have a param table where we can get all possible ISO Currency Codes:
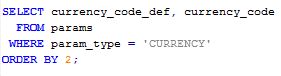
Once we use this simple query as LoV Query, indeed we ‘ll have a dynamic LoV object.
However, to make it more efficient, we can also create a shared component with it so we can could use that object on other pages too.
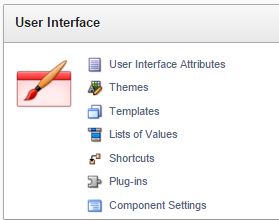
Go to Application Builder then select your Application and click to Shared Component link.
You ‘ll see some User Interface options there:
Write or Paste your Dynamic LoV Query to the text box.
Complete these steps by following on-page instructions.
Great!
Now we have a generic LoV which will list all the possible Currency Codes in our environment.
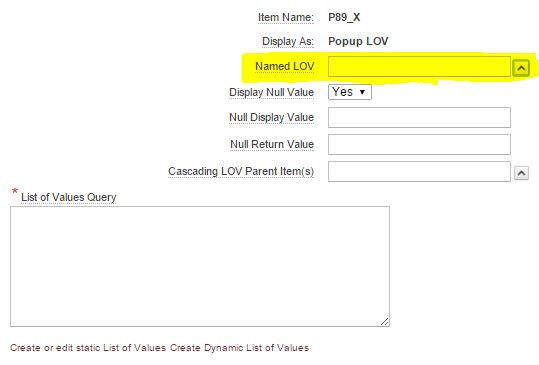
Now go a few steps back.. As you can see from List of Values Query/ Named LoV Selection there is a yellow marked area called Named LoV.
Click on it and pick your freshly built LoV.
Finally our user can input the currency codes without typing them manually :)

Cheers!
Hoi!
Say you need to dump a special set of data into a file..
Sure you can do that with fancy SQL clients which have graphical user interfaces. However, sometimes you do need to export your data set into a plain text file in a *certain* format, via sqlplus.
In some cases, for instance, if you ‘re going to use that file to feed another system, you ‘ll have to follow that 3rd systems data delivery rules. There can be some restrictions such as
etc.
So, since we are using sqlplus for our action, better prepare our query as a script.. I won ‘t explain all of these definitions, but it ‘s quite easy to find out what they do :)
Let ‘s write our .sql script by starting these SETs:
SET LINESIZE 300;
SET TERMOUT OFF;
SET ECHO OFF;
SET NEWP 0;
SET SPACE 0;
SET PAGES 0;
SET FEED OFF;
SET HEAD OFF;
SET TRIMS OFF;
SET TAB OFF;
SET SERVEROUTPUT ON;
SET SQLBL OFF;
SET RECSEP OFF;
If you think you don ‘t need some of them, just put a dash before the line to make it disable.
As you can imagine, first one is the one that you defined the maximum length of a line in your output file.. Needless to say, you should read the specs of that 3rd system before setting it :)
Then we need to enter a path to address the exported file ‘s location.
spool D:\EXPORTS\export.txt
you can place your sql query after this line. For example
SELECT 1
FROM dual;
then we will have to tell that the spooling has to stop, and script ‘s got to exit.
spool OFF;
exit;
Now we can save this file as an .sql file.
It would be a wise idea to test it. Run sqlplus on your terminal screen.
Most of us are using GUI tools for our daily works. If you don ‘t know how to run it, believe me it ‘s quite normal :)
On Windows, START > RUN > CMD
It will open a terminal window. Then use that syntax with your own parameters.
c:\> sqlplus user/pass@database_IP:port/service
On GNU/Linux, start eterm, xterm or any terminal you like :)
Can you see SQL> prompt? If yes, you are almost done. Otherwise you ‘ll have to google it :)
Well, let ‘s try to execute our script now.
SQL> @c:\example.sql
This should work.. Now we can check our spool output folder..
If you are using a Windows and everything was fine so far, maybe it ‘d be better to create a .BAT to make this whole process easier.
Write these lines in notepad,
# sample BATCH file
SET NLS_CHARSET = UTF8
c:\> sqlplus user/pass@database_IP:port/service @c:\example.sql
exit
..save the file with the .BAT extension.
Now you can use your Task Scheduler to execute that batch file automatically.
Hope it helps.. Next time maybe we can talk about configuring your Task Scheduler.
Cheers!
Cok uzun zaman once, bol bol bos vaktim varken yalnizca eglence olsun diye ugrastigim, sonra da notlarima bakarak nasil yaptigimi paylastigim bir Linux maceram :)
Evet, bugun acik kaynak kodlu yazilimlar son derece kullanici dostu, Linux dagitimlari kullanici memnuniyetine eskisinden daha cok deger veriyorlar. Ve evet, bugun ne bu telefonu, ne de kizil otesi baglantiyi kullanan biri kalmamis olmali. Fakat gozumun onunde dursun, ki baktikca eskiden ne cok bos vaktim diyelim :)
Referans gosterdigim linkler calismiyor ya da paketler artik dagitilmiyor olabilir.
Buyrun..
isletim sistemi : Linux/ Slackware 8.1
kernel : linux mos-laptop 2.4.18 #4 fri may 31 01:25:31 pdt 2002 i686 unknown
telefon : ericsson r520m
*baglanti icin kizil otesi (irda) kullandim.
—
Oncelikle telefonunuzu bilgisayara gosterebilmelisiniz, bunun icin irda-utils cekin, adres: http://www.irda.sf.net su andaki guncel surum 0.9.15
kullandiginiz kernel’da irda destegi yoksa sanirim bastan derlemeniz gerekiyor ancak guncel ve onerilen ayarlarla kurulmus linuxlarda bu destek var.
irda-utils’i kurduktan sonra /dev altinda gerekli aygitlari olusturmalisiniz, bunun icin:
mknod /dev/ircomm0 c 161 0 >mknod /dev/ircomm1 c 161 1>mknod /dev/irnet c 10 187
ve bunlar icin gerekli izinleri vermek uzere:
chmod 664 /dev/ir*
—
eger irda portunuzun hangi adresi ve kesmeyi kullandigini bilmiyorsaniz bios’unuzdan bunu ogrenip bir kenara not etmelisiniz.
irda-utils’i kurabilmissek, terminal penceresinde;
root@mos-laptop:/home/mos/progz# irattach /dev/ttys1 -s
root@mos-laptop:/home/mos/progz# irattach irda0 -s
root@mos-laptop:/home/mos/progz# modprobe irport io=0x2f8 irq=3
root@mos-laptop:/home/mos/progz# irattach irda0 -s
buraya kadar sorun yoksa,
cat /proc/net/irda/discovery
yazarak
irlmp: discovery log:
nickname: r520, hint: 0x9124, saddr: 0x57ce4e10, daddr: 0x10eb4046
gibi bir cikti alabiliyor olmalisiniz.(telefonunuz kizilotesi alicinizin onunde ve kizilotesi alma modunda olmali :) )
daha sonra http://www.easyconnect.linuxuser.hu adresinden cektigimiz gprsec adli programi kullanarak baglanti icin gerekli pppd scriptlerini olusturuyoruz, programi kurmak istediginizde tk ‘niz yok, grafik arabirimi kuramam diyebilir, problem degil zaten grafik arabirim pek hos da degil, bize sadece olusturacagi script gerekli.ama illa da grafik arabirim olsun diyorsaniz easyconnect.linuxuser.hu adresinde tk ‘yi nereden cekip nasil kuracaginizi anlatan bir yazi var.
terminal penceresinde sg_en yazarak script generator’i baslatiyoruz ve bize bir telefon listesi cikariyor, orada ericsson r520‘yi gorebilirsiniz (daha bircok model var). bir sonraki adimda bize telefonun listedeki numarasini soracak, oraya r520’ye karsilik olarak 60 yaziyoruz, sonra iletisim baglanti portunu soracak, buraya da /dev/ircomm0 yazarak geciyoruz, sonra apn name olarak hangi operatoru kullaniyorsaniz onu yazin, ben telsim yazdim. sonraki adimda da kullanici adi ve sifre girecek misiniz diyor, hayir diyoruz ve bize sony-ericsson-r520 adinda bi dosya olusturuyor bulundugu dizinde.
sonra:
root@mos-laptop:/home/mos/progz# pppd file sonyericsson-r520
yazinca asagidakine benzer ciktilar almis olmalisiniz;
at ok ate0 ok
ok
ericsson
ok
286023010009552
ok
ok
ok
ok
ok
+cgatt: 1
ok
connect serial connection established. using channel 1 using interface ppp0 connect: ppp0 /dev/ircomm0 warning – secret file /etc/ppp/pap-secrets has world and/or group access sent [lcp confreq id=0x1 ] rcvd [lcp confreq id=0x1 ] sent [lcp confrej id=0x1 ] rcvd [lcp confrej id=0x1 ] sent [lcp confreq id=0x2 ] rcvd [lcp confreq id=0x2 ] sent [lcp confack id=0x2 ] rcvd [lcp confack id=0x2 ] warning – secret file /etc/ppp/pap-secrets has world and/or group access sent [pap authreq id=0x1 user=”xxx” password=] sent [pap authreq id=0x2 user=”xxx” password=] rcvd [pap authack id=0x2 “”] sent [ipcp confreq id=0x1 ] sent [ipcp confreq id=0x1 ] rcvd [ipcp confreq id=0x1 ] sent [ipcp confack id=0x1 ] rcvd [ipcp confnak id=0x1 ] sent [ipcp confreq id=0x2 ] sent [ipcp confreq id=0x2 ] rcvd [ipcp confack id=0x2 ] local ip address 81.6.64.97 remote ip address 81.6.64.96 primary dns address 212.156.4.20 secondary dns address 217.31.224.129 script /etc/ppp/ip-up started (pid 320) script /etc/ppp/ip-up finished (pid 320), status = 0x0
not : bu islemleri ve baglantiyi root olarak yapmalisiniz.

Belirli zamanlarda uretmek zorunda oldugunuz bazi Excel dosyalariniz var diyelim..
Urettiginiz format belli, bu formati olusturmakta kullandiginiz diger Excel dosyalarin formati belli..
Surekli ayni dosyalari acip, kopyalamak, kucuk bazi formullerle bir takim hesaplamalar yaptirip diger Excel ‘e veri aktarmak.. Bu her ne kadar “kolay” olsa da vakit alan zahmetli bir is, degil mi?
Daha once ne Macro yazmis, ne de yazmayi dusunmustum.
Ama tam da yukaridaki gibi “rutin” bir islem her hafta buyuk vaktimi alacak gibi gorununce maliyetsiz, kolayca uygulayabilecegim bir cozum aramaya koyuldum.


Dim katilimci As StringDim sorumlu As StringDim tarih As DateDim sure As StringDim sonuc As String
Dim loc As Integer
loc = 2
loc degiskenimiz 2. satirdan baslasin dedim; cunku ilk satirda kolon basliklarimiz var.
Kucuk programimizin 2. satirdan baslayarak asagi dogru tablomuzu taramasini ve kaynak tablomuzdaki her bir satir icin bir sonuc formu olusturmasini istedigimize gore, satirlar bitince, yani bos bir satira gelince dongunun sonlanmasini soyleyelim.
Do While Not IsEmpty(Sheet1.Range(“a” & loc))
Boylece ilgili sheet ‘te bos bir satira gelmedikce loop etmeye birazdan ifade edecegimiz satirlari islet demis olduk.
O halde simdi kaynak tablonun nasil okunacagini ve sonuc formunun bu bilgilerle nasil doldurulacagini programlayabiliriz:
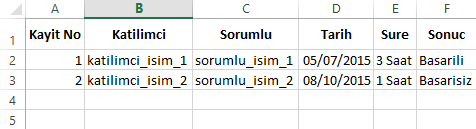
katilimci = Sheet1.Range(“b” & loc)
sorumlu = Sheet1.Range(“c” & loc)
tarih = Sheet1.Range(“d” & loc)
sure = Sheet1.Range(“e” & loc)
sonuc = Sheet1.Range(“f” & loc)
Her satiri tek tek aciklamaya gerek yok, ama gordugunuz gibi en ustte tanimladigimiz her degiskenin, ilgili sheet ‘teki koordinatlarini verdim.
Soz gelimi LOOP ‘un ilk turunda katilimci degiskeni, Sheet1 ‘deki b2 hucresinde buldugu degeri alacak.
Sonra Do While kosulumuza gore bir sonraki satir hala bos degilse, 2. kez loop edecek, bu kez b3 hucresinde buldugu degeri alacak.
Boylece bu 5 degiskenimiz her bir LOOP ‘ta kaynak tablomdaki ilgili degerlerle guncellenecekler.
Simdi bu degiskenleri sonuc formunda uygun yerlere adresleyelim..
Once kursorumuze artik “kaynak” sheet ‘inde degil “sonuc” sheet ‘inde islem yapacagimizi soyluyoruz:
Worksheets(“sonuc”).Select
Arkasindan katilimci, sorumlu, tarih, sure, sonuc degiskenlerimizin sonuc formunda hangi hucrelere aktarilacagini adresliyoruz:
Worksheets(“sonuc”).Range(“b7”).Select
ActiveCell.Value = tarih
Worksheets(“sonuc”).Range(“e10”).Select
ActiveCell.Value = katilimci
Worksheets(“sonuc”).Range(“e11”).Select
ActiveCell.Value = sorumlu
Worksheets(“sonuc”).Range(“e12”).Select
ActiveCell.Value = sure
Worksheets(“sonuc”).Range(“g14”).Select
ActiveCell.Value = sonuc
Burada da soz gelimi ilk blokta aslinda,
“sonuc” isimli sheet ‘imdeki b7 hucresine git, bu hucrenin degeri tarih degiskenimin degeridir. “
dedik.
Unutmayin, hala ilk loop ‘un icinde kursorumuz..
Simdi sonuc formu dosyamizin bu halini kaydedip bir sonraki satir icin yeni bir form olusturmaliyim.. O halde:
fname = katilimci & “_sonuc_dosyasi”
gibi bir satir yazalim, boylece her dosyanin anlasilir bir ismi olsun. Hala ilk LOOP ‘ta oldugumuzu soylemistik, o halde ilk sonuc formu icin dosya adi b2 hucresindeki katilimci ismi ile baslayacak, ikinci LOOP ‘a gectigimizde ayni ifade bu kez b3 hucresindeki katilimci ismini alacagi icin dosya adimiz bu yeni katilimci ismi ile baslayacak.
Simdi de sonuc sheet ‘ini kopyalayip istedigimiz bir klasore yazmasini soyleyelim.
Worksheets(“sonuc”).Copy
ChDrive (“C”)
ChDir (“C:\sonuc_formlarim”)
ActiveWorkbook.SaveAs Filename:=fname & “.xlsx”
Ilk satirda ilgili sayfayi almasini, ikinci satirda “C” harfiyle baslayan diskime gitmesini, ucuncu satirda dosyanin kaydedilmesini istedigim klasorun yerini, dorduncu satirda ise fname degiskeniyle yukarida belirledigim dosya adimin XLSX uzantisi ile kaydedilmesini soylemis oldum.
Boylece ilk sonuc formum doldurulmus oldu, o halde loc degerimi 1 artirmali, yani 1 sonraki satira gecmeli ve LOOP etmeliyim.
loc = loc + 1
Loop
Bu dongu ustte Do While ile belirttigimiz kosul saglandigi muddetce calisacak, bos satira gelince sonlanacak.
Burada istiyorsak programimizi
End Sub
Diyerek sonlandirip calistirmayi deneyebiliriz. Programimizi kaydedelim ve kaynak sayfamiza donelim.
Sayfaya ekledigimiz butona bastigimiza formlar otomatik olarak olusacaktir..

Ya da bonus olarak her bir dokumanin bir de default yazicimiza gitmesini soyleyebiliriz. Tabii ki bunu henuz LOOP icindeyken yapmaliyiz :)
Iyi calismalar!

Merhaba,
Bu yazimda sizlere APEX grafik raporlarindan bahsedecegim.
Bildiginiz gibi, interaktif olarak hazirladiginiz raporlariniz icin Action menusu yardimiyla analiz sayfanizda anlik rapor gorselleri alabiliyorsunuz.
Fakat veri setimizi kalici bir rapor olarak da; pasta dilimi ya da bar seklinde kullanicilarimiza sunmak isteyebiliriz.
Bunun yaninda kullanicinin raporda gordugu alanlara tiklamasi ile ilgili alani olusturan data setini ayni ekranda ya da ikinci bir tab ‘da verebiliriz.
Bu sekilde son kullanicilariniza tum detay kirilimlari bir seferde vererek koca bir set cikmak yerine, ise ozet ve bir bakista anlasilan bir gorsel sunarak baslamis oluruz.
Kullanici, yapacagi analiz dogrultusunda raporu dig edebilir, bir alt kirilima inebilir, raw data icinde bogulmamis olur.
Alttaki ornegimizi inceleyelim:
Elimizde farkli urun tipleri ve doviz cinsleri var. Para turlerine gore urun hacimlerimizi gruplayarak grafik haline getiriyoruz.
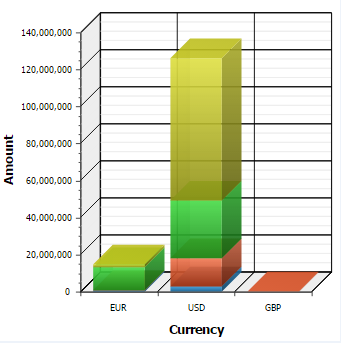 |
| Sekil.1: Ornek Grafik |
Simdi biraz basa donelim.

Gelen secenekler arasindan Chart ‘i isaretleyelim

Sonra ne tur bir grafik olusturmak istedigimizi secelim. Benim ornegim 3d Stacked Column.


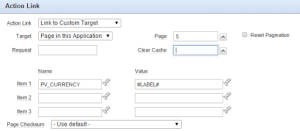
Bu sorgu calisinca sistem kullanicidan :pv_currency degiskenini bekleyecek. Bu sorguyu yeni bir interaktif rapor olarak kaydedelim.
Tabii ki :pv_currency icin bu yeni interaktif rapor sayfamizda Page Item, Page Item Button olusturmamiz gerekecek, bunlari da atlamalayim.
Simdi tekrar Grafigimize donuyoruz..

Iyi calismalar :)
