In a previous post I compared two solutions for the same ranking
problem. Now I would like to compare two solutions for the same
percentages report.
The goal of the query: Let's see the first 5% rows of the total
rows according to the salary in descending way.
Let's consider the solution in Oracle 12c, where we can use the
new FETCH {FIRST|NEXT}  <pct> PERCENT ROWS clause:
One of the possible traditional solution uses
the cumulative distribution (CUME_DIST) analytic function.
Let's consider the execution plan for that query which
uses the new FETCH {FIRST|NEXT} <pct> PERCENT ROWS clause:
Now we examine the execution plan of the query that uses the CUME_DIST analytic function:
We can observe that BOTH queries use the SAME EXECUTION plan,
but with different number of consistent gets (1551 versus 7!).
Other metrics are same.
I created a greater table:I executed the following queries:
Starting Oracle 9.0 – according to SQL 1999 standard – Oracle introduced the WITH option which can be considered
as the extension of the inline views.
Let’s see an “old” example:
(The origin of this statement is Oracle course,titled:
Oracle Database: SQL Fundamentals I
Volume II • Student Guide).
In Oracle 12c we have new enhancements for this kind of SQL statement:
We can define “in-line” functions or procedures after the WITH clause.
In the following example we are looking for those departments, where
total salary of the department is greater than the maximum of the average of the total salaries:
The result is:
The execution plan is the following ( not very simple!):
We can use the WITH option with plsql_declarations clause
in DML statements as well.
Let’s consider the following example where we want to compute the
tax amount of the salaries and modify the tax_amount column, but…
Analytic Views are one of the main features for Business Intelligence introduced with Oracle 12c Release 2. They provide a lot of new possibilities for analytical queries on star schemas. This blog post gives an overview of the new functionality.
There are many good reasons to use ANSI join syntax instead of the old Oracle join syntax. With one exception: If you want to use your Materialized Views for Query Rewrite, avoid to write them with ANSI joins.
And you want to prepare an interface for enduser so they could execute it by themselves.
however, your procedure is expecting some input parameters which are not so-easy for the users to get..
Let ‘s go with an example:
example
Say this procedure is taking an account number and generating a risk report for that customer.
So you decided to publish a form on one of your APEX user dashboards:
Building form on a procedure
After a few easy steps with this wizard, you ‘ll have your form with a field (i.e. :p_acc)on it prompting you to enter an account number
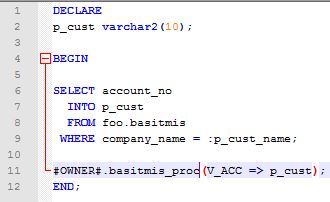
Although it works just fine, it is not that easy for users to know which company has which number. It would be way easier if they could go with company name for instance..
If you have no chance to touch to that procedure, means you can ‘t modify it to make it work with another parameter instead of v_acc (account number), you still can do something similar.
i. Create a Page Item on your page region
ii. Display as: Text with autocomplete
iii. Give your new page item a unique name (i.e. :p_cust_name)
iv. Adjust the population logic of your text field to make auto-complete thing work.
v. Then take a look at execution statement which runs your SP. You can see it by double-clicking Run Stored Procedure
vi. You ‘ll see something like this
#OWNER#.basitmis_proc(V_ACC => :p_acc);
vii. Now let ‘s modify it so it could work with our other parameter :p_cust_name
Let ‘s see what we did here:
i.We declared another variable p_cust
ii.Use it to collect account number. To know which customer ‘s account should return, we used our Page Item p_cust_name and remember, this information was provided by user.
iii.Then we bind it to our SP
**
Now your users can type ABC to automatically get ABC Company in the company name field, then click the button that triggers your execution process. Your little declaration above will do the rest :)
Bir sorgu hazirladiniz ve bu sorgudan donen sonucu periyodik olarak bir tabloya yazmak istiyorsunuz..
Ya da bu bir rapor ve bu rapora bakarak periyodik olarak bir kisi ya da ekibe mail gondermek istiyorsunuz..
APEX icinden nasil mail gonderilecegine dair kucuk bir ornegi su yazimda anlatmaya calismistim.
Simdi ise bunu “otomatik” hale getirmeyi deneyelim.
Farkli yontemler elbette var, ama ben -veri tabaninizin “eski” bir versiyonda olmadigini varsayarak- dogrudan dbms_scheduler uzerinden bir procedure ile ilerleyecegim.
i. Oncelikle sorgumuzu bir procedure haline getirerek objemizi olusturalim. Bunu APEX ‘in etkilesimli menulerine yaptirabilecegimiz gibi SQL konsolunda elle de yapabiliriz.
createorreplaceprocedure“ORNEK_BASITMIS”is
…
…
Sorgunun detaylari bu yazinin konusu degil. Fakat soz gelimi, belirli bir data setini dinamik olarak sececegimiz alicilara gondermek istiyorsak
Bir cursor acabilir,
Sonra bu cursor ‘i loop icinde %NOTFOUND oluncaya kadar fetch ederek aksiyonumuzu aldirabiliriz: mesela her defasinda bir email gondermek gibi.
Schedule etmeye karar verdiginiz islem sisteme periyodik olarak email gonderme isi vermekse ve ornek mail gonderme kismini burada isledigimiz gibi apex_mail.send uzerinden kotariyorsaniz, dikkat etmemiz gereken aslinda belki de tek onemli nokta su:
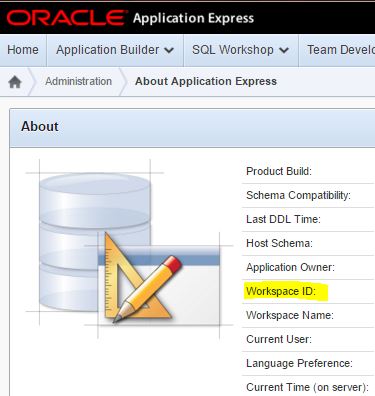
Hazirladiniz SP icinde BEGIN END arasinda APEX Workspace ID ‘nizi assign emelisiniz..
ORA-20001: This procedure must be invoked from within an application session.
gibi bir hata ile karsilasirsiniz :)
APEX Workspace ID
Bu ID bilgisine ustteki gibi erisebilirsiniz. Set etmek icin asagidaki gibi bir ifade kullaniyoruz:
wwv_flow_api.set_security_group_id();
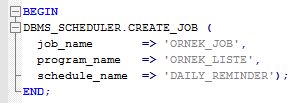
Stored Procedure ‘imizi hazirladik ve ORNEK_PROCEDURE ismi ile create ettik diyelim. Simdi sirasi ile DBMS_SCHEDULER ile once bir program create etmeliyiz:
DBMS_SCHEDULER.CREATE_PROGRAM
Ardindan bir schedule create ediyoruz:
DBMS_SCHEDULER.CREATE_SCHEDULE
repeate_interval degiskenine dikkat edelim. Burada frekans, saat, dakika, saniye turunden bir cok deger verme sansimiz var..
Dolayisiyla, Ayin belirli bir gunu, Haftanin belirli gunleri, gunun belirli saatleri gibi spesifik periyod tanimlari yapabiliyoruz. Detayli bilgiye Oracle dokumanlarindan erisebilirsiniz.
Simdi de job create edelim:
DBMS_SCHEDULER.CREATE_JOB
Artik veri tabaninda bir SP ‘miz var ve bu SP ‘nin istedigimiz zaman araliklarinda otomatik calismasi icin bir Program tanimimiz, bir Schedule ‘imiz ve bir de Job ‘imiz var..
Simdi program ve job ‘imizi “acalim”.
Enable
Hazir.. Artik repeat_interval olarak verdigimiz vakit geldigi zaman job ‘in calismadigini kontrol edebiliriz.
Mesela az once enable ettigimiz Job ‘u suradan gorebiliriz:
select * from dba_scheduler_jobs;
Zamani geldiginde islemin calisip calismadigini ise su tablodan takip edebiliriz:
select * from user_scheduler_job_run_details;
Yaptiklarimizi drop etmek icinse yine DBMS_SCHEDULER icindeki
drop_job
drop_schedule
drop_program
yapilarini kullanabiliriz. Fakat tahmin edebileceginiz gibi bunlari “sirali” yapmalisiniz, aksi takdirde sistem dependency nedeniyle kizacaktir :)
You published a useful interactive report for your users and now want to let them get that as email also through that page.
Here you can find a basic example..
Go to your report page from Application Builder panel
Create a page item button
Pick Defined by Dynamic Action as button action
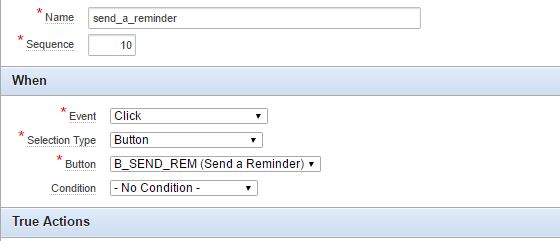
Right click to your brand new Dynamic Action and select Create.
APEX Dynamic Action
As you can see above, we have to create this action with some conditions. Such as:
Event: Click
Selection Type: Button
Button: address your button which you ‘ve just created. This item will trigger your email sending process.
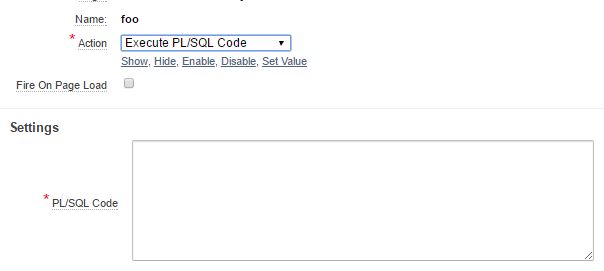
Once we completed these steps, we can add a True action. You ‘ll see a button named Add True Action at your Dynamic Action Edit page. You can also create one by choosing from right click menu.
Adding a TRUE action
You may want to uncheck Fire On Page Load. Because.. Well we want to trigger it by clicking our button, manually :)
So.. Now we need this PL/SQL code which will take care of sending email via Oracle APEX.
I ‘ll share 2 basic examples with you. One for plain-text emails, one for HTML based ones.
I personally prefer to send mails in HTML format… But it ‘s up to you and depends on your needs..
It is pretty easy, right? Just give the right parameters and a simple sentence as email body. You can always use variables to collect these informations like i did..
If you want to go with HTML format, then you ‘ll need some extra time to create a good-looking and small-sized body. That ‘s all :)
Once you store these codes you ‘ve wrote and apply the changes onto your report page, you can start using your button. It should be sending emails to given address. Click on your button and wait couple of minutes to receive it.
I am not going to remind you not to copy everything from my sample snapshots. You do need to change email addresses etc. :)
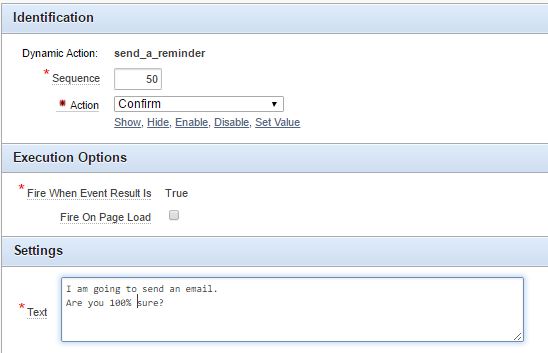
Should you want to add some extra features on this dynamic action, you can add another True action(s) as well.
You may need to.. Otherwise someone would be able to click on that button more than necessary and we don ‘t want to spam people :)
Let ‘s add a Confirmation action..
Right Click, Create
Action: CONFIRM
Now you ‘ll be prompted to click OK everytime you click on your email button..
O.K. but not enough? Well let ‘s hide the button after it ‘s got clicked.
Now we have a button on our report page
Our authorized report viewers can click on it to send email
We have a confirmation dialog before trigger
Our email send button will be hidden once it used.